Embarking on your journey through Honkai: Star Rail, you'll find yourself in the captivating world of Amphoreus, with the first map to explore being the Eternal Holy City Okhema. This sprawling city is split into two distinct areas: Kephale Plaza and Marmoreal Palace, each brimming with secrets and treasures waiting to be discovered.
Your adventure in Okhema kicks off following a tumultuous event in Penacony. After Black Swan's advice, the latest Trailblaze Mission leads you to a new planet. Unfortunately, an attack on the train coach derails your plans, scattering your team across an unfamiliar landscape. It's here that Phainon steps in, guiding you not only to safety but also introducing you to key figures within Amphoreus, all while leading you to the awe-inspiring Eternal Holy City Okhema.
Eternal Holy City Okhema Treasure Locations in Honkai: Star Rail

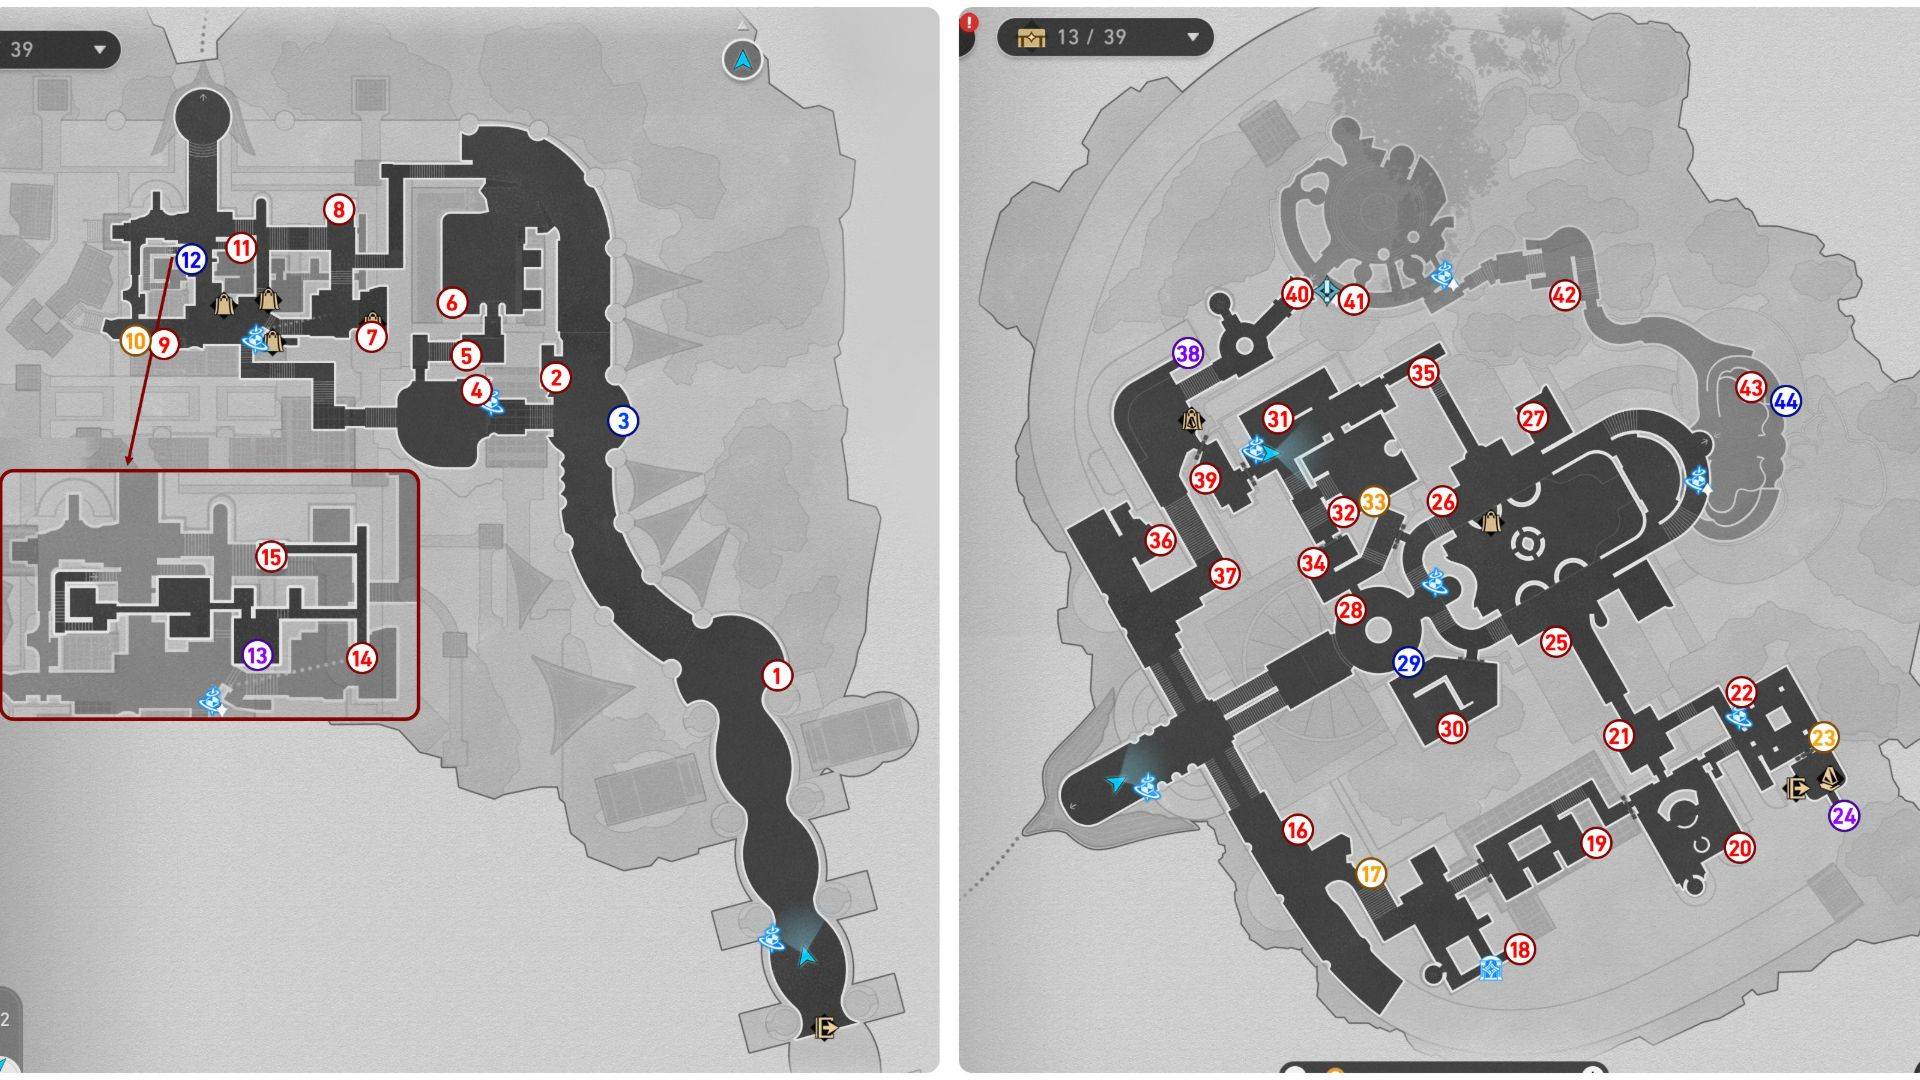
As you set foot in Okhema, you'll be on the hunt for a total of 33 Treasure Chests, alongside 4 Flying Spears, 3 Spirithiefs, and 4 Golden Scapegoats. To maximize your treasure hunting efficiency, consider bringing 'The Herta' along. Her Technique is invaluable as it marks several unclaimed treasure chests on the map. Additionally, Topaz can prove to be a great ally; her companion Numby will alert you and guide you to nearby chests.
The map highlights are color-coded for your convenience: blue for Golden Short Spears, purple for Spirithiefs, and yellow for Golden Scapegoat locations.
- 1. Begin at the Path of Parting Space Anchor, venture north to the spacious area, and locate a treasure chest to the east.
- 2. Proceed along the path towards Kephale Plaza. As you approach the Space Anchor, bypass it and head east to find a treasure chest near the rest area.
- 3. From your current position, look southeast to find a breakable shield with a spear embedded in it. Rewind time to follow the Golden Short Spear, which will eventually spawn a treasure chest.
- 4. Teleport to the Kephale Plaza Space Anchor, where a treasure chest awaits right beside it.
- 5. Head north through the small hallway, and you'll spot a Basic Treasure near the crates.
- 6. Continue down the hallway into a plaza, where a treasure chest sits beside a dinosaur to the west.
- 7. Utilize the Marmoreal Market Space Anchor and move east to discover a treasure chest inside Chartonus Smithy, the blacksmith shop.
- 8. Keep going north to find a Basic Treasure at the end of the road.
- 9. Return to the Marmoreal Market Space Anchor and travel far west until you encounter two breakable shields. Break them to reveal the treasure chest behind.
- 10. Adjacent to the previous chest, you'll find a Golden Scapegoat puzzle. Solve it by guiding the golden goat to illuminate the altar, unlocking the chest.
- 11. Head back to the center of the market and walk north to find two small steps on either side. Climb the right steps first to secure a Basic Treasure.
- 12. Descend the stairs and cross to the opposite side to spot a breakable shield with a spear. Break the shield, fix the Golden Short Spear, and follow it to the second floor.
- 13. The spear should halt near the ritual fountain. From there, head east to walk on the rooftop, following the path until you reach a treasure chest on the rooftop’s edge. Be prepared, as a Spirithief will appear and snatch it. Use Oronyx’s power to rewind the fissures and retrieve the treasure from the Spirithief.
- 14. The next chest is located at the southern end of the road.
- 15. After collecting the previous chest, head northwest to claim the last treasure chest on the rooftops.
- 16. Use the Marmoreal Palace Space Anchor and move southeast towards the Dromas Stop by the road. The treasure chest is concealed behind a breakable shield.
- 17. Proceed to the stairs on the east side, where a Golden Scapegoat puzzle awaits. Solve it to uncover another Basic Treasure chest.
- 18. Continue up the road to a small bathing area, where a chest is tucked away in the corner near a lounge chair.
- 19. Walk northeast to a room filled with scrolls, and find the treasure chest near the last cabinet.
- 20. Keep moving northeast to another bathing area, where the treasure chest is beside the long table.
- 21. Look north to find a door leading to a room with a bard and an audience. Inside, you'll find a Basic Treasure.
- 22. Warp to the Hall of Respite Space Anchor and turn around to find a treasure chest right next to the anchor.
- 23. Cross the room to solve the Golden Scapegoat puzzle on the opposite side, unlocking another treasure.
- 24. Enter your private chamber next to the previous Golden Scapegoat puzzle and walk to the end of the balcony to retrieve a Spirithief’s treasure chest.
- 25. Head to the Overflowing Bath Space Anchor and go to the southern part of the bathroom to find a treasure chest submerged in water.
- 26. Cross to the other side of the room to find another chest also in the water.
- 27. From your current position, walk northeast to the swimming pool with a Dromas. The treasure chest is in the water beside the creature.
- 28. Return to the Overflowing Bath Space Anchor and walk through the waterfall to reach the reception area. A treasure chest is visible beside a chair.
- 29. Move to the opposite side of the room and destroy the breakable shield. Fix the Golden Short Spear and follow it to claim a chest.
- 30. While following the flying spear, enter the back room where a treasure chest sits atop a box. Don't miss it before continuing after the spear.
- 31. Use the Court of Seasons Space Anchor to spot a treasure chest near the wall.
- 32. Head to the massage room in the south, where a Basic Treasure awaits near the beds.
- 33. In the same room as the previous treasure, solve the Golden Scapegoat puzzle to unlock a hidden treasure.
- 34. Exit the massage room and walk south to find a treasure chest inside the storage room.
- 35. Return to the Court of Seasons Space Anchor one last time and head northeast to the corridor for another treasure chest.
- 36. Now, teleport to the Marmoreal Palace Space Anchor and go north to the crate storage area. The treasure chest is near a dinosaur.
- 37. Continue upwards to find the next treasure chest near a group of NPCs.
- 38. Follow the path to a banquet and walk to the left side of the stairs. The treasure chest is beside a cushion on top of the partition.
- 39. From your current spot, enter the room to the south and retrieve the treasure chest behind the breakable shield.
- 40. Leave the room and head to the elevator on the north side, but don't use it yet. Instead, go to the back of the elevator to find another hidden treasure chest.
- 41. Take the elevator to the second floor and head east to find a Basic Treasure near the Flying Amphora in front of the cabinet.
- 42. Continue along the path to the Garden of Life Space Anchor and head east to a small private room, where another treasure chest awaits.
- 43. Teleport to the Hero’s Bath Space Anchor and go to the pool in the north to find a treasure chest submerged in water.
- 44. Finally, use the swirling pillar to ascend, and you'll find a breakable shield with a flying spear. Fix the Golden Short Spear and follow it to unlock the last treasure chest in Okhema.
Collecting these treasure chests is not just an adventure; it's one of the most effective ways to amass Stellar Jades in Honkai: Star Rail. With the introduction of the new area in version 3.0, diligent Trailblazers who uncover all the chests and solve the puzzles in Amphoreus will find themselves with a substantial amount of Jades, ready to enhance their journey through the stars.


